NOTE: CAPTOR for MobileIron is designed to work with the MobileIron UEM platform (Core or Cloud). This application is managed by your company IT department, and certain features and settings will be locked based on how it is configured for you.
Basic Controls
From the main screen you will have buttons for the various capture modes (Photo, Video, Audio, and Document Scanning), QR-Code reader, Folders, recently captured or edited content, and Settings.

Pressing the one of the Capture buttons will launch a capture session. You can switch between modes without going back to the home screen. Each mode has its own set of options.

Photo Capture
Photo mode is intended to look very similar to the default iOS photo app. You have the ability to switch to self-facing camera, use the flash, and capture as many photos in a session as you need. You’ll notice a thumbnail will appear as you take photos with a counter displaying how many media items have been captured in the session. Photos can be annotated and edited by tapping the thumbnail.
Please note, if you capture more than one media in any given session, tapping the thumbnail will bring you to a Folder where you can then select any given item for editing or sharing.
Video Recording
Video capture mode provides many options to control the quality and size of the video file. On the top of the screen is a quality button allowing you to toggle through High, Med, and Low quality. This will adjust the recording quality of the video. There is also a Frames Per Second (FPS) button, which will adjust the frame capture rate. The FPS values vary based on the device.
Video capture mode includes a flash button (which illuminates the subject area continuously as a “torch”). Videos can be previewed and edited by tapping the thumbnail.
The maximum length of any video is set by policy and indicated by the red progress bar going around the capture button.
If “Show Caption” is toggled on in Settings, a final frame will be added to every video that indicates the username, time/date of capture, location of capture, and a long note. This information can be previewed by opening the video and tapping the media info (i) button. This is also where you can add a note, rename the file, and adjust the way the location is displayed.

Document Scanning
To scan a paper document, receipt, etc., select the DOC mode. We recommend placing the document on a surface that provides a color contrast from the paper (avoid using a white tabletop or desk) so that the automatic cropping and rectangle detection can function. You can also turn on the torch (flash button) to illuminate the page.
The workflow is slightly different based on the iOS version running on the device.
Hold the device directly above the paper so that the paper almost fills the screen, but where you can still see all four corners. The default is to auto-capture the page as soon as the app has focused and identified the four corners. Switch to "Manual" if the system has trouble identifying the edges of the document. The filter button allows you to switch between Color, Black & White, Grayscale, or Photo. Tapping on the thumbnail will preview the document and allow you to adjust cropping, filters, and page orientation. Don't forget to tap Save when you are finished scanning!
*There is a 24 page limit for each scanning session. If you need to scan more than 24 pages, use the Merge feature detailed below. Inkscreen tests scans up to 48 pages but there is not a hard limit on the number of pages for any particular document.
After scanning the document, you'll be able to preview the file and perform the following tasks:
Rename the file: Tap the default name to customize
Adjust the page cropping: Double-tap a page to open it in the Edit/Annotation screen. Tap the Undo button to remove all cropping, tap the Pen button then the Crop button.
Annotating the document: Double-tap a page to open it in the Edit/Annotation screen. Tap the Pen button and select one of the annotation functions (draw, arrows, text labels). The color options include a semi-transparent highlighter.
Re-ordering pages: Tap the Grid button, then hold down (long press) a page to drag it to a new location in the document.
Deleting pages: Tap a page to highlight it, then tap Delete.
Merge with another document: Tap the “+” button and select option to either scan additional pages to add to the document, or merge with a document that already exists in one of your CAPTOR folders. If you merge with an existing document, you will be given the option to retain the original or delete it.
Audio Recording
Audio mode allows for the recording of ambient audio. Recordings can be played back and trimmed in the Edit screen. You can also view and update the metadata (file name, location information, and note) in the Edit screen.
Audio files can be shared/exported as either M4A or AIFF file types.
Search
CAPTOR Search can be accessed from the Home screen or the Folder screen. Content is searchable by:
File and Folder Names
Media Notes that were added to Photos, Videos, and Audio
Text Label Annotations added to Photos and Documents
Text Detected in Documents and Photos using optical character recognition (OCR)
Speech Detected in Audio and Video recordings using Speech Recognition (*permission must be allowed, and IT Admin must enable in MobileIron)
Object Recognition Labels for photos.
Annotations & Edits
Photos and Document pages can be edited and annotated very easily. The available tools include:
Contrast: Adjust the saturation, brightness, or contrast of the media
Rotate: Rotate 90 degrees at a time
Crop: Reduce the size of the image or fix the automatic cropping of a document page
Arrow: 3 size options, 8 colors, and a semi-transparent highlighter option
Draw: 3 size options, 8 colors, and a semi-transparent highlighter option
eSign: Create an electronic signature to apply to a document. Includes username, time/date, and location (if enabled)
Text Label: 3 size options, 8 colors, and a semi-transparent highlighter option
Undo/Redo: You can always undo changes to go back to the original photo, even after sharing it.
Media Info (Metadata)
CAPTOR has some unique features leveraging metadata that is both automatically captured and inputed by the user. For all media, the app will automatically tag the username, location, and time/date of capture. To view, edit, or add to the metadata, open the media into the Edit/Annotation screen and tap the “i” button at the bottom of the screen.
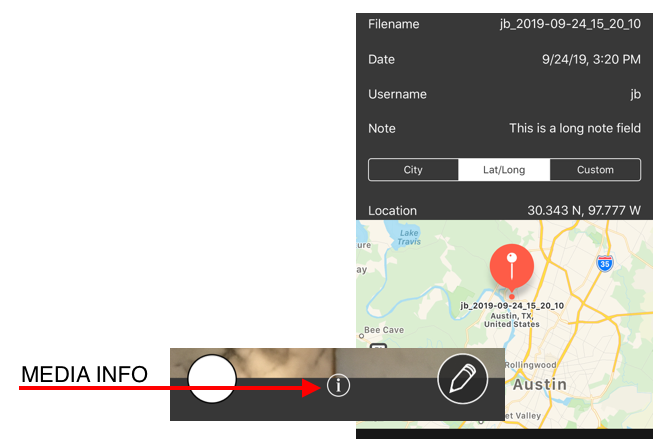
From here you can see the metadata that was automatically captured and assigned to the content, and you are able to customize certain elements, such as switching the location from City/State/Country to Latitude/Longitude. You can also enter a Note. This is also where you would find audio transcripts, text detected in photos, and object recognition labels generated by the CAPTOR AI/ML model.
Please note, this set of data can be displayed on the media as a visible watermark, as well as being passed as metadata when the content is shared. For videos, a “final frame” is added containing this information. Your IT department has the ability to lock this feature.
Sharing/Exporting
You can share content from the Edit/Annotation screen, or while viewing a Folder. Sharing from a Folder enables you to select and share multiple files at once (the files will be added to a ZIP archive for exporting).
From Edit/Annotation screen, tap the Share button. The File Type options will be relevant to the media you are sharing. The Quality selector allows you to increase or decrease the resolution or quality of the content, and thus the file size. There is a File Size Calculator to enable you to see exactly how large the file will be when shared.
When sharing a PDF, you will be presented with Page Size options enabling you to format the document in Letter, Legal, A4, or A5 size. You can also set a PDF Password that will encrypt the file after it has been shared from CAPTOR, requiring the password in order to unencrypt and view the file.

Depending on your company’s EMM settings, you may be restricted on which apps you can share/copy content to. The Open In menu will display all possible apps however you may receive a warning if you attempt to share to an unauthorized app. An Email button will be visible if your IT department has authorized sharing/copying content to the native iOS email app.
From within a Folder, you can tap Select and highlight any number of content items of any type, and tap Share. The File Types presented will depend on what you have selected. The Quality selector will resize all selected items. If you share more than one photo at a time, you will have the option to combine them into a single PDF, or ZIP the individual JPG files. You can also swipe left on a folder name to share the entire contents of the folder.
Folders
All content captured by CAPTOR is stored completely separate from personal albums. Tap the Folders button on the home screen to see a set of default folders.
Tap + to add a new folder.
Tap the Search button to enter search criteria. The search will span file names, notes, text annotations, and folder names.
Tap Backup (if configured, and set to Manual Backup) to backup all new content.
Swipe left on a folder to reveal options to Delete the folder, Edit the folder name, Share the contents of the folder as a zip archive, or Backup the folder (if configured).

Folder Contents
Tap on a folder name to see the contents of the folder. Tap a file to open it in the Edit screen.
There are three content views available. Tap the View button to switch between Small Thumbnail, Large Thumbnail, and List View.
List View displays the file name, date, and location. Swipe left on a file from List View to reveal shortcut options to Delete, Edit, Share, or add to Favorites.
Sort allows you to sort content by Name, Date, or Type.
Select allows you to Move, Share, or Delete content. This powerful feature makes it easy to select multiple items at once. For example, if you want to share multiple items at one time, tap Select, highlight each photo, then tap Share.

Settings
From the home screen, you can access CAPTOR Settings by tapping the “i” button on the top right. Many of these settings will likely be locked by your IT department.
Username: May be included in metadata of shared content and stamped on photo captions, or added to final frame of videos.
Show Caption: Determines whether media info will be stamped on shared photos and added to final frame of shared videos.
Prompt for Location Services: Determines whether the end user will be able to allow location services to be used to add location data to content.
Location: Setting the default location criteria as either City or Lat/Long will dictate the data that is used in the caption of the media. City will display the “City, State, Country”, while Lat/Long will display the “Latitude, Longitude” coordinates.
Filename Base: CAPTOR will automatically assign a unique name to all captured content. You or your company can customize the file nomenclature. The base will be appended with the date and time of capture.
Disable Image Recognition: Disables the CAPTOR AI/ML object recognition model which detects specific items in photos and applies labels to the file.
PDF Version: CAPTOR supports the creation and validation of a wide range of PDF versions (1.3-1.7 and PDF/A), and can be set here or by IT policy.
File Export Max Size: Sets a limit (MB) to the size of any exported file, typically set to match corporate email attachment size limit.
Delete Trash After (Days): Sets the amount of time (in days) after a file has been moved to the Trash folder that it will be permanently deleted from the data container on the device. A value of 0 (zero) will instruct the app to delete the contents of the trash folder at the beginning of each session.
Watermark: Adds a visual semi-transparent text string watermark to photos and documents.
Backup Config: CAPTOR enables an optional service to copy content from the app to a network drive or company server. This can be configured to occur automatically or manually on-demand by the app user. This setting will only be visible within the app settings if your IT Admin has enabled it by policy. One of the data transfer protocols must be enabled with the appropriate connection and authentication settings applied. There is a button to test the configuration here. If there is a problem with your configuration please report the specific error message you see to your IT Admin.
Backup Advanced Config: This group of backup settings dictates whether the service is to occur automatically on a schedule, or if it is intended for the user to manually backup content on demand. You can also set the quality/resolution of the content that will be backed-up. Finally, there is an option to have the content deleted from the device container after it has successfully backed up to the server. The deletion can occur on a delay so that you have access to the content for a specified period of time on the device before it is deleted.
Help: The Help menu includes different ways to request support from Inkscreen. If you run into a problem, the best way to report it is by using one of the Log File exports.
Privacy Policy: Review Inkscreen’s privacy policy.
Version: Displays current version information including any integrated SDKs and third party libraries.
Register for Email Updates: Sign up to receive information on future releases.
User Authentication: In some unmanaged situations, you will be able to determine how to authenticate CAPTOR.
If you ever need assistance from the Inkscreen Support Team, tap Help and either Email Support or Share/Email Log
Files.

Contact Inkscreen Support:
www.inkscreen.com/support +1 (512) 888-9090 support@inkscreen.com